How useful would it be if you are notified on phone with the photo of visitor on door moment doorbell rings 🙂
Let us build a low cost and simple solution without intercepting anything on 220v supply of doorbell.
Things you need
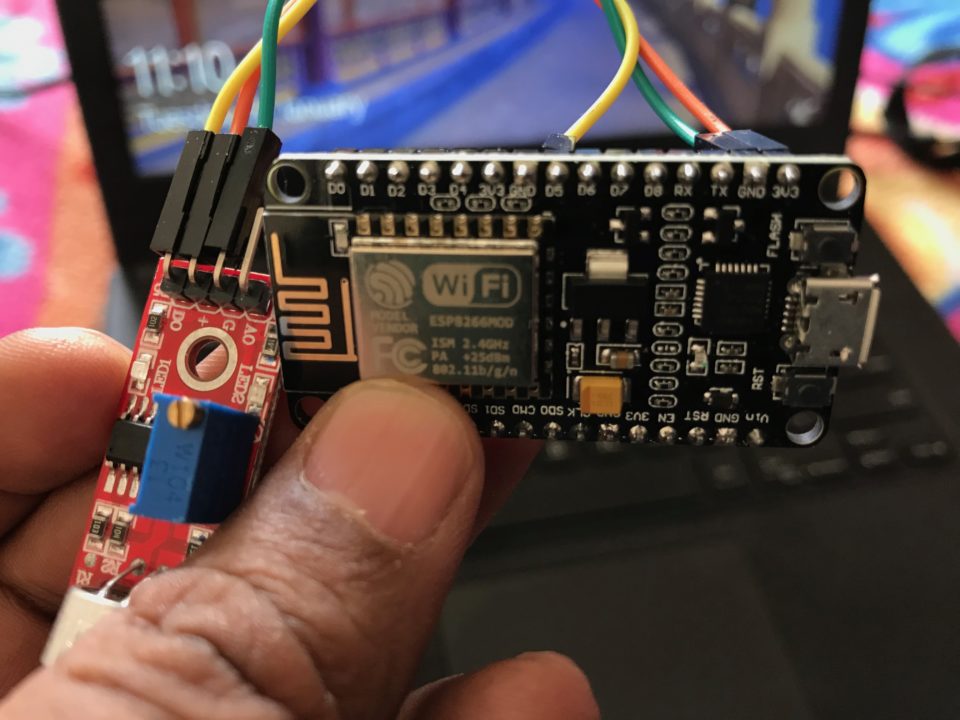
1) NodeMCU board.
2) sound sensor with digital output(it a simple mic hooked on a small PCB).
3) MQTT broker, you can use any cloud MQTT service or build your own on raspberry pi or another Linux machine.
4) MQTT client on raspberry pi. You can also configure MQTT broker and client on same raspberry.
5) Webcam.

I have my own MQTT broker on Raspberry.
How does it works ?
1) When someone presses doorbell, sound sensor installed close to bell detects sound and sends message “1” on topic “bellbang” to MQTT network. You should tune sensitivity of sensor with the screw on board to make sure it does not catches noise from other sources and is just enough to detect only doorbell sound.
2) MQTT client on raspberry subscribed to topic “bellbang” receives “1” message and which triggers webcam to take a snap and then sends this photo to your twitter handle and telegram account.
Let us take deep dive in implementation
Connect sound VCC (+), GND, D0 to VCC, GND and D5 of NodeMCU board.
Then flash following code on NodeMCU. Make some noise close to sound sensor mic and see output on serial monitor. You can also run MQTT client with subscription to “bellbang” topic on a linux machince to ensure NodeMCU is transmitting messages on MQTT network.
manish@iotbox:~ $ mosquitto_sub -h mqtt_broker_ip_host -p 1883 -t "bellbang" -u mqtt_user -P mqtt_password
1
Code for NodeMCU
#include "ESP8266WiFi.h"
#include "Adafruit_MQTT.h"
#include "Adafruit_MQTT_Client.h"

/************************* WiFi Access Point *********************************/

#define WLAN_SSID       "your_wifi_ssid"
#define WLAN_PASS       "your_wifi_password"

/************************* Adafruit.io Setup *********************************/

#define MQTT_SERVER      "Your MQTT broker host/IP"
#define MQTT_SERVERPORT  1883                   // use 8883 for SSL
#define MQTT_USERNAME    "your MQTT username"
#define MQTT_KEY         "your MQTT password"

/************ Global State (you don't need to change this!) ******************/

// Create an ESP8266 WiFiClient class to connect to the MQTT server.
WiFiClient client;
// or... use WiFiFlientSecure for SSL
//WiFiClientSecure client;

// Setup the MQTT client class by passing in the WiFi client and MQTT server and login details.
Adafruit_MQTT_Client mqtt(&client, MQTT_SERVER, MQTT_SERVERPORT, MQTT_USERNAME, MQTT_KEY);

/****************************** Feeds ***************************************/

Adafruit_MQTT_Publish bellbang = Adafruit_MQTT_Publish(&mqtt, "bellbang");

/*************************** Sketch Code ************************************/

// Bug workaround for Arduino 1.6.6, it seems to need a function declaration
// for some reason (only affects ESP8266, likely an arduino-builder bug).
void MQTT_connect();

int soundSensor=D5;

void setup() {
  pinMode(soundSensor,INPUT);
  Serial.begin(115200);
  delay(10);

  Serial.println(F("Door bell alert...."));

  // Connect to WiFi access point.
  Serial.println(); Serial.println();
  Serial.print("Connecting to ");
  Serial.println(WLAN_SSID);

  WiFi.begin(WLAN_SSID, WLAN_PASS);
  while (WiFi.status() != WL_CONNECTED) {
    delay(500);
    Serial.print(".");
  }
  Serial.println();

  Serial.println("WiFi connected");
  Serial.println("IP address: "); Serial.println(WiFi.localIP());
}

void loop() {
  // Ensure the connection to the MQTT server is alive (this will make the first
  // connection and automatically reconnect when disconnected).  See the MQTT_connect
  // function definition further below.
  MQTT_connect();

//read data from sensor
int SensorData=digitalRead(soundSensor);

  // Now we can publish when sensor value becomes high
  //Serial.print(SensorData);
  //Serial.println(F("\n"));
  delay(50);

  if(SensorData==1)
  {
    if (! bellbang.publish(1))
    {
      Serial.println(F("\nBellbang publish Failed"));
    }
    else
    {
    Serial.println(F("\nBellbang publish OK"));
    }
    delay(3000);
  }
}

// Function to connect and reconnect as necessary to the MQTT server.
// Should be called in the loop function and it will take care if connecting.
void MQTT_connect() {
  int8_t ret;

  // Stop if already connected.
  if (mqtt.connected()) {
    return;
  }

  Serial.print("Connecting to MQTT... ");

  uint8_t retries = 3;
  while ((ret = mqtt.connect()) != 0) { // connect will return 0 for connected
       Serial.println(mqtt.connectErrorString(ret));
       Serial.println("Retrying MQTT connection in 3 seconds...");
       mqtt.disconnect();
       delay(5000);  // wait 5 seconds
       retries--;
       if (retries == 0) {
         // basically die and wait for WDT to reset me
         while (1);
       }
  }
  Serial.println("MQTT Connected!");
}
Client code subcribing to the “bellbang” topic and clicking snap, sending message on tweet and telegram. I found telethon available only for python3 so make sure you have installed tweepy and opencv for python3.
#!/usr/bin/python3

import paho.mqtt.client as paho
from telethon import TelegramClient, sync
import tweepy
import time
import cv2
import logging

# Populate the Twitter API keys below
consumer_key = 'Your_twitter_consumer_key'
consumer_secret = 'your_twitter_consumber_secret'
access_token_key = 'your_twitter_token_key'
access_token_secret = 'your_twitter_token_secret'

# Telegram API Keys
tele_api_id = your_telegram_api_id
tele_api_hash = 'your_telegram_api_hash'

broker="Your MQTT broker host/IP"
port=1883
topic="bellbang"
username="your_mqtt_username"
password="your_mqtt_password"

#do some basic logging
logger = logging.getLogger(__name__)
logger.setLevel(logging.DEBUG)
handler = logging.FileHandler('/var/log/bellbang.log')  # create a file handler
formatter = logging.Formatter('%(asctime)s - %(levelname)s - %(message)s') # create a logging format
handler.setFormatter(formatter)
logger.addHandler(handler)# add the handlers to the logger

def on_subscribe(client, userdata, mid, granted_qos):
#       print("Subscribed: "+str(mid)+" "+str(granted_qos))
    print("Waiting for message bellbang topic...")

def on_message(client, userdata, mqttmsg):
    print(mqttmsg.topic+" "+str(mqttmsg.qos)+" "+mqttmsg.payload.decode("utf-8"))

    if mqttmsg.topic == 'bellbang' and mqttmsg.payload.decode("utf-8") == '1':
        # authentication
        auth = tweepy.OAuthHandler(consumer_key, consumer_secret)
        auth.set_access_token(access_token_key, access_token_secret)

        t=time.strftime("%d-%m-%Y %H:%M:%S", time.gmtime())

        logmessage=" bellbang "+mqttmsg.payload.decode("utf-8")
        logger.info(logmessage)
        print("Capturing image of person at door....")
        camera = cv2.VideoCapture(0)
        return_value, image = camera.read()
        cv2.imwrite('/tmp/doorperson'+'.png', image)
        del(camera)

        print("Sending image capture on telegram")
        teleclient = TelegramClient('session_name', tele_api_id, tele_api_hash).start()
        teleclient.send_message('your_telegram_id', 'Someone on door')
        teleclient.send_file('your_telegram_id', '/tmp/doorperson.png')

        print("Sending image capture on twitter")
        api = tweepy.API(auth)
        tweet = "@your_twitter_handle Some one at door at " + t
        image_path ="/tmp/doorperson.png"
        status = api.update_with_media(image_path, tweet)
#       api.update_status(status = tweet)

client = paho.Client()
client.username_pw_set(username, password)
client.on_subscribe = on_subscribe
client.on_message = on_message
client.connect(broker, port)
client.subscribe(topic)

client.loop_forever()
Now I am planning to extend this to trigger video call to my phone so that I can talk to person on door over some video client like skype, Google duo etc.
